

Radiant barriers are foil-like materials that reflect radiant heat rather than absorb it. They are installed in new homes to reduce summer heat gain and energy costs.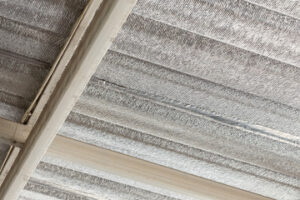
They work by reducing thermal radiation across the space between the attic floor and the roof deck, where conventional insulation is usually placed. For professional assistance, contact Ultimate Radiant Barrier & Insulation.
The cost of a radiant barrier varies widely, depending on how much is needed and where it is installed. For example, a large home requires more material than a smaller one. It also depends on whether it is installed over existing insulation or whether new insulation is being added. For homeowners who are considering this energy-saving option, it is a good idea to compare prices and check out different installers.
Adding a radiant barrier to your attic will reduce cooling costs by reducing the amount of heat that enters your home from the sun. It acts like a reflective sunshade, sending the radiant heat back into the atmosphere. This will cut your cooling costs by five to ten percent, and it may even allow you to downsize your air conditioning unit.
Radiant barriers work best in warm climates and can be used as an alternative to thermal insulation. However, they can be costly in cool climates, particularly when they are placed over ductwork or heating system air plenums. For this reason, it is recommended that homeowners consult with their state or local energy agency before installing a radiant barrier.
A professional installation is typically recommended because it can help ensure that the material is applied correctly to achieve optimal energy savings. It is also possible for homeowners to install radiant barriers themselves, but this type of project requires careful planning and understanding how the material works. A do-it-yourself project is not recommended unless you are comfortable working on the attic ceiling and have access to the right tools.
The installation process of a radiant barrier can be completed in a few hours, although it is recommended that you take the time to follow the manufacturer’s instructions and safety precautions. This will help to avoid damage to your attic ceiling and increase the effectiveness of your radiant barrier. It is also important to be careful when stapling around junction boxes and electrical wires so as not to injure yourself or cause any damage to your house’s insulation.
Depending on how your home is insulated, the type of radiant barrier that you choose, and the location where it is installed, it may pay for itself in 10 years or less. Regardless, it is a worthwhile investment that will provide long-term savings on energy costs.
Energy Efficiency
Radiant barriers work to reduce energy costs by preventing radiant heat from entering the home. They prevent the transfer of radiant heat by reflecting it, but they don’t reduce the transfer of conductive heat like thermal insulation materials do. Radiant barriers are typically installed in the attic of new homes or retrofitted into older homes.
When properly installed, radiant barriers can significantly reduce summer air conditioning loads. They can also reduce heating costs by reducing duct and HVAC system run times. Additionally, radiant barriers can improve indoor comfort by lowering attic temperatures and reducing the time it takes to cool the house.
Many homeowners find that installing radiant barriers pays for itself within a few years, with the savings on their electricity bills far outweighing the cost of installation. However, the exact amount of savings will vary depending on the cooling load, local utility rates, and financing terms.
In general, radiant barriers can save homeowners between $200 and $300 a year in energy costs. The savings are also often accompanied by reduced wear and tear on the HVAC system, which results in further savings on repair and replacement costs.
The effectiveness of radiant barriers can be diminished by dust that collects on the surface. Some research notes a decrease in efficiency as a result of this, but other studies have found that even with dust on the surface, radiant barriers still offer significant reductions in cooling loads.
Some contractors install radiant barrier sheathing, which is plywood or OSB with foil adhered to one side, in new homes during construction. This is typically attached to the joists of the attic and is designed to be covered by a layer of attic insulation. This approach is typically less costly than retrofitting an existing attic.
Some installers also use radiant barriers to wrap the exterior of buildings. This is done in situations where the cladding can be placed over the top of the barrier, such as when brick veneer is used on a building. When this technique is used, it is important that the cladding cover be able to create a 1 inch air space between the sheathing and the cladding to allow for the convective flow of air. When this is not possible, sheathing must be secured to the cladding with furring strips to ensure the air gap is always maintained.
Installation
Radiant barriers are installed in homes primarily to reduce summer heat gain and cut cooling costs. They are typically installed on top of existing insulation and can save up to 10 percent of monthly energy costs. However, radiant barrier alone doesn’t provide year-round benefits and isn’t able to stop heat transfer like batt and roll or blown-in insulation.
It’s important to have a qualified insulation and radiant barrier expert install the product. They should be able to determine whether it’s suitable for your home and advise on the amount of insulation required. They should also ensure that it’s installed correctly to maximize its effectiveness.
Installation of a radiant barrier involves placing the foil-faced insulation boards on attic floors and stapling them to joists and ceiling framing. It’s important to keep the insulation boards aligned straight and flat when stapling and not compress them, as this will decrease their energy-saving capability. You should also inspect the insulation for any signs of sagging or damage and address any problems promptly to maintain its efficiency.
While installing the radiant barrier, it’s important to pay attention to any obstructions in the attic. For example, if there is electrical wiring or ductwork in the attic, these should be sealed to prevent air leakage that could affect the performance of the radiant barrier. In addition, it’s important to check for moisture in the attic ceiling. If there is too much water vapor in the attic, it may condense and cause water spots or even rot the insulation and wood framing.
When properly installed, radiant barriers can be a great option for new and existing homes, especially those in warm climates. In addition to reducing summer heat gain, they can help reduce energy costs in the winter by reflecting radiant heat from heaters back into the building. Radiant barriers can be purchased at most home improvement stores and are fairly simple to install.
While the primary use for radiant barriers is in attics, they can also be used in walls, on hot water tanks, and even wrapped around ducts. They can be installed on either a vented or unvented wall and have different applications depending on the type of cladding. It’s also important to know which way the reflective barrier should face, since this will influence its performance.
Maintenance
Radiant barrier is an innovative insulation that can significantly reduce the transfer of heat into and out of your house. It does this by reflecting thermal radiation rather than absorbing it and by working in tandem with other insulation, such as attic or wall insulation. It is an important component in any home in the Texas area, especially in new construction, as it can cut energy costs and help save on installation and construction costs. It’s also useful in existing homes, but only if it is installed correctly.
The most common way to install a radiant barrier is to drape it on the attic floor during the construction of a new house, although it can also be used in an existing attic. In this case, it is usually placed just under the roof sheathing and stapled to the rafters or joists. This is a job best left to professional installers.
Regardless of the method, it is important to have proper ventilation in your attic, as this helps prevent the buildup of moisture and dust. Having adequate air circulation will also ensure that your house is heated more evenly throughout the year and will save you money on heating and cooling costs.
There are several myths about radiant barriers, but the truth is that they do not cause overheating in your home. In fact, they keep your attic cooler during the summer, which can cut down on your energy bills by up to 10%. They may increase the temperature of your shingles on a hot day, but this is minimal and does not accelerate their degradation.
If you have a radiant barrier in your attic, it’s important to inspect it on a regular basis for any signs of damage or disintegration. A periodic inspection is the best way to detect problems and address them before they become more serious. In addition, it is a good idea to check for any holes, punctures, or gaps in the material.
You can also use a flashlight to inspect your attic. Be sure to wear safety equipment, such as long sleeves and gloves. It’s also important to have a staple gun and a flashlight to make it easier to see what you’re doing.