Water Damage Restoration
Disaster Restoration

Water Damage Restoration – What You Need to Know

If your home has suffered water damage, you will need professional help to clean and sanitize the affected areas. Look for IICRC-certified experts and a company that complies with OSHA standards.Water Damage Restoration

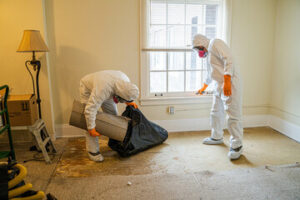
Experts at Water Damage Restoration Oklahoma City has industrial-strength equipment that can effectively dry and clean wet materials. They also have the right tools to safely handle hazardous materials.

If you experience a water damage emergency, it’s important to call a professional immediately. This will prevent the problem from worsening and save you thousands of dollars in potential damages. In addition, it will also help prevent health risks like bacterial growth and mold.

Before you can start restoring your home or business, it’s important to find the source of the water damage. This will help you decide which type of restoration process is best for your situation. A comprehensive assessment will also help you file insurance claims and schedule repairs.

The most common causes of water damage include:

Exterior floods from overflowing gutters, flooded basements, and clogged drains. Interior problems such as a burst pipe, backed-up sewer lines, or a failing water heater.

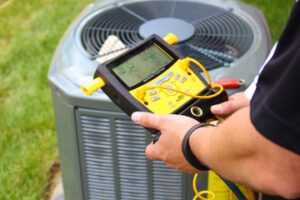
IICRC certified experts know how to identify the source of your water damage. They will use high-quality moisture meters to assess the level of moisture in your home. They will then use the appropriate tools to remove the moisture and restore your home.

If you are not sure which type of water damage you have, it’s important to contact a IICRC expert immediately. They will assess your home or business and determine the extent of the damage. They will then provide you with an estimate for the cost of repairs and restoration.

A comprehensive assessment is a valuable tool for homeowners, property owners, and insurance companies. It can help you identify the type of water damage, determine its severity, and determine if additional repairs are needed. A professional IICRC restoration company will conduct a thorough inspection of your home or business, taking into account the cause and extent of the damage.

Whether your water damage is due to flooding, a broken sink or appliance, or a malfunctioning hot water heater, it’s important to contact a certified IICRC expert immediately. An IICRC-certified company will follow industry best practices and keep up with the latest technology. They will be able to assess and treat your water damage quickly and effectively, saving you money in the long run. They will also be able to repair your home or business to its original condition.

IICRC Certified Experts

Water damage can be caused by a variety of factors, from a burst pipe to a flood. No matter the cause, it’s important to act quickly to avoid additional issues like mold growth. Hiring IICRC Certified Experts can help you clean up the mess and restore your property to its normal state.

The IICRC is a globally recognized certification and standard-setting organization in the inspection, cleaning, and restoration industries. Their certification programs teach professionals best practices and technical expertise in their areas of specialization, helping them deliver high-quality services to customers. The IICRC offers a variety of courses, including the Water Restoration Technician (WRT) course, which provides students with the knowledge and skills needed to restore properties affected by water damage. This course can be taken online, including the exam, or in a classroom setting. The IICRC also offers the Applied Structural Drying (ASD) course, which builds upon the WRT class to focus on the drying process for structures and contents.

When water gets into your home, it can damage surfaces and substructures like drywall, plaster, wood, and carpeting. It can also lead to mold, rot, and other problems. Unless the problem is addressed quickly, it can cause significant structural damage and even loss of property. This is why you should always hire IICRC certified experts to handle any water damage repair.

Professionals with IICRC training can conduct an extensive examination to find the source of the water and determine the extent of the damage. They can then use specialized equipment to extract the water and dry out the area as quickly as possible. This may include commercial-grade air movers and dehumidifiers, as well as power washers to remove any debris and dirt from the surface.

Once the water is removed, the specialists can start working on restoring the structure to its pre-loss condition. This can involve replacing drywall, carpeting, and other materials, as well as sanitizing and disinfecting the area. In addition, they can also install air filtration systems and use antimicrobials to prevent mold growth. The restoration process can be lengthy, but it’s essential to complete it quickly to avoid further damage or health risks.

Clean Up

The cleanup stage of water damage restoration follows the mitigation phase. This step involves removing items that are too damaged to be saved, including furniture, personal belongings and other materials like carpeting and rugs. The restoration company may also remove drywall and other structures to facilitate drying. This is essential to prevent hidden mold growth, which can cause a wide range of health issues including respiratory distress and allergies. It’s important to note that this process can take a significant amount of time, depending on how much water was present and how long the affected materials were wet.

Once the area has been cleared of any hazardous materials, professionals can begin extracting moisture using air movers and dehumidifiers. During this stage, restoration experts monitor moisture levels to ensure the affected areas are dry before moving on to the cleaning process. They will use a variety of techniques to clean and sanitize the home, including foam, immersion, and abrasive cleaning methods.

After assessing the extent of the damage, the restoration expert will create two piles: one for items that can be saved and one for things that must be thrown away. Paper products, food, and electronics will most likely need to be thrown away, as well as anything made of porous materials such as drywall or wood floors. Those items that can be saved will need to be thoroughly cleaned and sanitized, which will involve a lot of scrubbing, soaking and vacuuming.

Before starting to clean up after a plumbing leak, it’s important to shut off the electricity at your breaker box. This will prevent electrical shorts and fires, which are common when dealing with wet materials. It’s also important to protect yourself by wearing rubber gloves, boots and a dust mask. The contaminated gray water from plumbing leaks can contain bacteria, viruses and other harmful germs, which can pose a serious threat to your health.

Water damage restoration is a complex task that requires the help of an experienced and professional restoration company. To ensure that your home is restored quickly and correctly, hire a company that employs IICRC certified experts. IICRC certification ensures that the technicians are trained in the latest industry standards and have the skills to effectively restore your property.

Dry Out

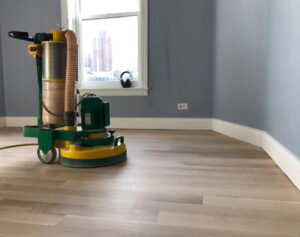
It’s important to dry out the affected area quickly to prevent mold and mildew. This may require removing carpeting, house rugs and furniture from the area. Items like this can act as a breeding ground for bacteria, viruses and fungi that put your family’s health at risk. To speed up the process, you can open windows and doors as much as possible to promote air circulation. It’s also a good idea to run fans and dehumidifiers to remove moisture from the air.

The amount of water damage will determine how long it takes to dry out the space. Some materials such as drywall and carpets can take up to 72 hours or more to completely dry out. It’s essential to follow specific protocols when drying these and other materials in your home.

A professional restoration company will have the specialized equipment needed to effectively dry out your home or business. They’ll start the process by assessing the damage and finding the source of the water. Once they’ve removed all the excess water, they can begin the process of cleaning and sanitizing. The company will then dry the space using air movers and dehumidifiers. They’ll also use specialized moisture meters to ensure the space is properly dried out.

If you’re experiencing water damage to your property, it’s best to contact a professional immediately. This will help to minimize the amount of damage caused and reduce future problems. They can clean, repair and restore your belongings as well as provide you with peace of mind.

There are a number of things you can do yourself to help the restoration process along, but it’s always best to hire a professional water restoration contractor for serious cases. If you can, it’s a good idea to turn off the power in the affected area. This will prevent electrical issues that can cause additional problems and safety hazards. In addition to this, it’s essential to shut off any appliances or equipment that are plugged in and could potentially experience an electric shock. You should also make sure to remove any debris from the water damaged areas as soon as possible.

Air Conditioning Repair
HVAC

Air Conditioning Repair – Understanding the Causes of AC Problems

When it comes to Air Conditioning Repair Woodland Hills understanding what causes your AC problems is key. It can help you determine whether an AC repair is necessary or if replacing the unit makes more sense.Air Conditioning Repair

If cool air isn’t flowing through your home’s vents, it could mean one or more of the following issues.

A dirty evaporator coil can be one of the biggest causes of your AC system not cooling properly. This is because the coil’s job is to absorb heat from your living space and transfer it to the refrigerant. When it’s dirty, the air conditioner will have to work harder and longer to accomplish this task, leading to more wear and tear on the system. This can lead to expensive repair bills and a shorter system life.

Dirty evaporator coils can be a result of many things, including a poorly installed air filter, dirt and dust blowing in from the outside or mold and bacteria growing on the coil. This is why cleaning your air filters on a regular basis is so important. If you don’t have a proper air filter, your home will be full of dust, pollen, pet dander and other particles that can make their way into the air conditioning unit.

You can perform a simple clean-in-place on your evap coils with a pump sprayer, professional-grade evaporator coil cleaner and a brush. The pump sprayer will provide plenty of pressure for the wand to reach into tight spaces, while the brush will help to loosen and remove any stuck on particles. If your evap coil is very dirty, a pull-and-clean may be needed.

The easiest way to check if your evaporator coil is dirty is by looking for any visible buildup of debris on the coil. This will be a dark color and can include mud, mold and dirt. The coil can also freeze if it gets too dirty, which means the air conditioner will cycle on and off constantly and won’t cool your home.

You can also check to see if your evaporator coil is dirtier than it should be by measuring the air pressure at the vents that take in room temperature air and at the air pressure on the evaporator coil. If the difference is large, this could be an indicator of a dirty coil. You can try to do a clean-in-place on your own, but it’s recommended that you have an air conditioning technician inspect and perform the necessary repair.

Dirty Compressor Coils

The air conditioner’s evaporator coil and the outdoor compressor coil are both susceptible to dirt buildup. This is especially true when these parts are neglected for extended periods of time. Dirty coils make your AC system work harder, which can lead to increased energy usage, higher repair bills and shorter unit lifespans.

A dirty evaporator coil can’t absorb your home’s warm air, which can cause the refrigerant inside to freeze. This stresses the unit and can eventually damage the compressor. The best way to prevent this from happening is to clean your evaporator coil regularly. You can do this by spraying it with a garden hose to remove loose debris, then cleaning it using household detergent or an air conditioning coil cleaner.

Your air conditioning unit’s evaporator coil can also become dirty when the condensate drain line becomes blocked with dirt or debris. To clear the blockage, shut off the power to your air conditioner and use a shop vac to suck out any dirt or debris that has accumulated on the condenser fan blade and coil.

Another common problem that can lead to air conditioning coils becoming dirty is a bad condenser relay switch or run capacitor. These components provide startup power to the compressor. Gradual capacitor failure can go unnoticed and stress the compressor and condenser fan motor windings, which may ultimately result in their failure. The best way to protect against this type of failure is by replacing the capacitor about every five years.

While it’s normal to see some variation in your energy bill, an unexpected increase can indicate a problem with your air conditioning. Dirty coils force the air conditioner to work overtime to maintain a comfortable temperature, which increases its energy consumption and leads to higher utility bills. If left untreated, a minor coil problem can quickly turn into an expensive one that requires a system replacement. This is why it’s so important to stay on top of your air conditioning maintenance schedule.

Low Coolant Levels

Coolant is used to pull heat away from the engine, so if your coolant levels are low, the engine could overheat. Fortunately, most modern vehicles have an automatic cut-off feature when the engine overheats to avoid significant damage. Still, if your vehicle doesn’t have this feature, you will need to stop driving until the engine is cooled enough to restart. The best way to check the coolant level is to open your car’s hood and observe the radiator cap or overflow reservoir. This is typically located near the engine and has a picture of a radiator and maximum and minimum marks on its side. You can also use a dipstick to measure the coolant level in the reservoir.

If the coolant is low, it is possible that there is a leak in the cooling system. The coolant tank, radiator, hoses, and other parts can all wear out over time and cause liquid to leak or evaporate. The radiator hoses in particular are exposed to hot coolant whenever the engine is running, so they will eventually wear out and break. When this happens, it’s important to replace the worn hoses before they crack or burst and start leaking coolant on the road.

One of the worst things that can happen when your coolant levels are low is that you may blow the head gasket on the engine block. This can cause significant engine damage that will cost you a lot of money to fix. A few telltale signs that your engine is about to blow a head gasket include smoke coming from the engine or exhaust, a loss of power, and engine banging sounds.

Another way that you might notice a problem with your coolant is if your heater doesn’t work properly. The heater in your vehicle uses the same coolant that feeds the engine, so if it isn’t working as it should, this can indicate low coolant levels.

You can try to drive with low coolant for a short period of time, but this is not recommended. If you do, be sure to pay close attention to your temperature gauge and make frequent stops for more coolant. You should also check your radiator hoses frequently to be certain that they are not wearing out or have loose clamps.

Warm Air From Vents

When an AC is working properly, it should provide cool air to every room of the house. Several things can cause this air flow to be blocked, from dirty air filters to leaking ducts. Fortunately, most of these problems are easy to fix.

Changing the thermostat setting from “heat” to “cool” can often solve this issue, since doing so will let your compressor cycle on and off as needed to keep your home cool. Occasionally, it’s easy to change this setting by accident during cleaning or when kids are playing around the thermostat.

If you’re still feeling warm air from the vents, check that your return and supply vents are open and free of obstructions. Make sure nothing is piled on top of the vents, like furniture or boxes, and that there are no holes or cracks in your ductwork that could be letting outside air in (and blowing out cooled air).

Another common reason for AC vents to start blowing warm air is low refrigerant levels. Without enough refrigerant, the evaporator coil can’t expand as needed to create cold air. A professional can check your refrigerant levels and re-fill them to the proper amount as part of an AC repair service.

A blown fuse can interrupt power to the air conditioning unit, which causes the motor to stop running and produce warm air as it tries to continue cooling the home. This is usually an easy fix, though it’s best to have a professional examine the fuse and wiring for any damage or signs of corrosion.

In addition to checking the refrigerant levels, a professional can also inspect and clean the air conditioner unit surroundings. It’s important to give the unit at least two feet of clearance to function properly. Plants growing too close, loose yard debris, or rodent nests in the area can all interfere with proper air flow and cause an AC to overwork. An experienced professional can easily take care of these issues to get your system back up and running.

flooring
Flooring

How Hardwood Floor Refinishing Can Make Your Home More Attractive

flooringHardwood Floor Refinishing Bergen County NJ can make your home more attractive to potential buyers, increasing the value of your property. It also eliminates safety hazards like splintering wood and dated finishes. It’s important to know that not all hardwood floors can be refinished, especially engineered wood. Solid hardwood floors can be refinished, but refinishing engineered wood requires extra care to avoid sanding through the veneer and exposing plywood underneath.

A thorough sanding is the first step in refinishing hardwood floors. It is also one of the most difficult parts of the process and requires special equipment. To do it properly, you’ll need a drum or orbital sander, an edger, a hand scraper and a vacuum cleaner. You should also have a variety of sandpaper grits, from coarse to fine. Before sanding, remove any furniture or wall hangings from the room and cover any fixed items with plastic sheeting to protect them from dust. You should also wear a dust mask, ear protection and eye protection during this phase of the project.

After sanding the floor, you should vacuum it thoroughly to remove any remaining dust. You can then use a buffer to smooth the surface and create an even texture. This is also the time to fill in nail holes, gouges and other minor imperfections. If you want the repair to match the color of your new finish, use wood putty mixed with sawdust and applied with a brush.

Cupping is another problem that can occur during a refinish. It happens when the tops of the planks bend down and leave gaps between them. It usually occurs in areas that get a lot of moisture, and it can be corrected by using a different sanding screen or by refinishing the entire floor.

Once the floor is smooth, you can reinstall base shoe molding — sometimes called quarter-round — around the perimeter of the room. This is easy to do with a brad nailer. Then reinstall the baseboards and caulk any cracks in the walls and joints between them.

If your hardwood floors have deep scratches, dents and other damage, a professional may be the best choice for refinishing them. A qualified hardwood flooring refinisher can make sure that any repairs blend seamlessly into the rest of the floor and that the finished product is flawless. They can also advise you on whether your floors need a complete refinish or whether a recoat is sufficient. A recoat is much simpler, and it’s cheaper than a refinish.

Staining

Staining hardwood floors the right way can help ensure they’re both beautiful and durable. Whether you’re refinishing, resealing, or simply staining wood floors that have never been stained before, it’s important to follow instructions carefully so that the result is exactly as you want it. Staining is a messy job, so be sure to wear gloves, take precautions against dust and dirt, and cover furniture. You’ll also need to thoroughly clean the surface of your floor before staining, vacuuming and wiping it down with a microfiber cloth or tack towel. Even a tiny speck of dust or dirt left on the floor can mar the finished stain.

Before you start staining, it’s a good idea to test the color of your new stain in an inconspicuous area. Choosing the wrong color is one of the most common mistakes made by DIYers. If you’re unsure what to choose, ask your flooring professional for samples of different colors and see how they look on the actual floor.

When the staining is complete, you may need to water pop your floor before sealing. This process opens the pores of the wood, making the appearance of the stain less blotchy and uneven. This step is especially important when working with darker stains or if you’re going for a richer color.

Once the stain is dry, it’s time to seal your floors. There are several options for this, including polyurethane and hardwax oil. Whichever option you choose, be sure to apply two coats and let them fully dry between each application. If you have any questions about how to apply the sealer or finish, ask your flooring professional for help.

Depending on your choice of stain and the color you’ve chosen, it can take several hours for your floor to completely dry. Once it has, you’re ready to enjoy your refinished floors! Whether you’re looking for an earthy brown or a neutral gray, staining your hardwood floors is an easy and affordable way to enhance your home. With the right preparation, a little bit of patience, and the help of a flooring professional, your hardwood floors will look beautiful for years to come.

Sealing

When refinishing hardwood floors, it’s important to protect them with at least two coats of protective finish. The finish helps keep water and chemicals off the wood, preventing damage to the floor and prolonging its life.

The first step is to thoroughly clean the surface of the floor, removing all dirt and debris. Once the floor is clean, you can apply the sealant.

A polyurethane sealant is the most common choice for hardwood flooring. It is available in different finishes, from matte to gloss, and comes in both water-based and oil-based versions. Water-based polyurethanes are typically quicker to dry than oil-based ones. They also tend to have less of an odor and are generally more environmentally friendly.

Before applying any kind of finish to your hardwood floors, it is important to read the instructions carefully. It is also important to test the finish in an inconspicuous area of the room to see how it looks and how it reacts with your particular flooring.

Choosing the right stain is another important part of this process. Your floor specialist should have samples of stains that you can look at to get an idea of how the stain will look on your floors. It’s also a good idea to do some research on your own to find stains that you like the look of.

Once you’ve decided on the type of stain, your floor professional can help you with the rest of the refinishing process. They will use a high-density foam roller to apply the stain, and may need to use a brush in some areas. After the stain is applied, it will need to dry completely before you can apply a second coat.

Penetrating oil finishes are a popular option because they give the wood a rich, warm amber color and offer a high level of protection. However, these finishes can’t hold up to heavy foot traffic and must be re-oiled every three to five years. Oil finishes can also be very difficult to touch up, as they are easily damaged by water and chemical spills.

Installation

Hardwood floors are beautiful, durable and add a sense of sophistication to any room. However, they can become scratched or scuffed over time, and they do require some maintenance to keep them looking their best. Fortunately, hardwoods can be refinished to remove scratches and dents and restore their original beauty. This process will also protect the floor from future damage, making it look new again. Unlike other types of flooring, sanding hardwood floors is not difficult, and it can be done by homeowners with minimal experience.

Before sanding, it’s important to clean the floor thoroughly to ensure there is no dust or dirt that could affect the final finish. This can be done by vacuuming and wiping down the surface with a microfiber cloth or tack cloth. The tack cloth should be dampened with mineral spirits to get the most out of the cleaning.

Sanding can take two to four days, depending on the condition of the wood and how much work is needed. Once the sanding is complete, it’s time to stain the floor. Using the same color stain as the existing floor is usually recommended, as this will give a consistent appearance. Staining can take up to two days as well.

Once the stains have dried, the floor can be reinstalled. Be sure to countersink all face-nails and fill any nail holes with wood putty that matches the floor color. Replace baseboards, shoe molding and trim as necessary. Often, the floor meets an obstruction like a fireplace or wall, and if this is the case, it is often recommended to miter boards around these obstacles to create a frame that mates with the rest of the floorboards.

Some people prefer to install prefinished hardwood flooring, which saves a lot of installation time. However, this option is not ideal for those with busy lifestyles, as the floors must be sanded and stained on-site before they can be installed. Engineered hardwood is another alternative, but it’s important to understand that this type of wood is not as solid as solid hardwood. It consists of a thin layer of real wood, known as a veneer, which is bonded to a cheaper material, such as plywood. You can refinish engineered wood floors, but the veneer needs to be thick enough to avoid accidentally sanding through it and exposing plywood.

Wooden Fence
Fence

Advantages of a Wooden Fence

Wooden fence comes in a variety of styles, including stockade, picket, lattice, post-and-rail, and shadow box. They can also be stained or painted in a wide range of colors.Wooden Fence

Tropical hardwoods like Brazilian walnut and cumaru are another option for outdoor wooden fences. They have natural beauty and are resilient, but they also come with a higher price tag.

A wooden fence is a great way to improve the value of your property while adding privacy and security. However, the longevity of a wood fence depends on a few factors, including the type of wood used and external forces like weather. The more durable types of wood are cedar and redwood, which can last for decades with regular maintenance. In addition, some woods are naturally resistant to rot and insect infestation, while others, like pine or oak, are more prone to these problems.

When choosing wood for your fence, it is important to consider your local climate and your budget. For example, some woods are better suited to wetter climates than others, like cedar and cypress. While these types of wood are more expensive than other options, they can also last for decades.

Another consideration is the type of infill board. In-fill boards are the slats that make up the majority of your wooden fence and can be made from a variety of materials. Common in-fill board materials include pine, cedar, and cypress.

It is important to choose high-quality wood when building a wooden fence because the material will have a significant impact on the durability of your fence. A good wood will stand up to a variety of environmental conditions and resist the effects of rot and pests, which are common issues for fences.

Wooden fences are also easy to maintain because they are less prone to damage than other types of fencing. Wooden fences can be cleaned with soap and water to remove dirt and debris, and they can be treated with wood treatments and staining solutions to protect them from the elements. It is a good idea to inspect your fence regularly for signs of damage or wear, such as dark spots or cracks, and to repair any damages immediately.

Easy to maintain.

When properly maintained, a wooden fence can last for years. To ensure that it’s able to resist the elements, you should clean and stain the wood once a year. It’s also a good idea to check for signs of damage on a regular basis, such as loose boards or rusted hardware.

To clean a wooden fence, start by rinsing it with water. This will remove any debris that may have accumulated over time, such as leaves or dirt. Then, use a pressure washer to spray the wood. It’s important to keep the pressure low and move the wand in a consistent motion. Doing so will help prevent the wood from becoming splintered.

If your wooden fence has particularly stubborn stains, you can try using a wood cleaner or mildew remover. These products can be purchased at most home improvement stores. You should also consider hiring a professional to pressure wash your fence a couple of times a year. A professional will have the proper equipment and knowledge to attack difficult stains, like mold or algae, with ease.

The most vulnerable part of a wooden fence is the posts. This is because they are in direct contact with the ground and can be subject to heaving due to winter freeze-thaw cycles. To avoid this, make sure that the posts are buried at least 6 inches into the ground. Then, coat them with a wood preservative. Also, be sure to replace any nails that have rotted or come loose. This will prevent the posts from splitting or rotting in the future. Finally, be sure to inspect the hardware and re-tighten any loose screws or bolts. You can also use waterproof glue to repair split or broken pieces.

Aesthetics.

In many cases, homeowners and business owners choose wood fences for their aesthetics. They can enhance the look of a home or create a unique look that stands out from the rest of the neighborhood. Wood fences can come in a wide range of colors and stains, allowing them to complement any color scheme. They can also be painted with a variety of finishes, such as water-resistant paint. They can even be stained and carved to make them more visually appealing. Additionally, wood fences can be topped with panel heads in different styles, such as dog-ear and French Gothic, to further enhance their aesthetic.

Another benefit of wood fences is that they can be customized to fit the needs of a particular home or business. For example, some people prefer to use a more rustic style for their fencing, while others like to match it with the surrounding landscape. Additionally, wood fences can be stained and painted to help protect them from damage caused by UV rays. Additionally, some types of wood are more resistant to weather conditions than others, so it is important to consider the location and climate before selecting a fencing material.

For homeowners, a wooden fence can provide a natural and appealing appearance that complements the surrounding landscape. It can also add privacy and security to a building. In addition, it can provide protection for children and pets. Additionally, it can be used to block out noise or limit access to areas that are dangerous, such as pools. Lastly, it can be used to block out neighbors’ views of a backyard pool or other area. In addition, it can be a cost-effective option for schools and businesses.

Privacy.

Wooden fences offer privacy by creating a barrier between you and your neighbors. They’re also a great option for protecting garden areas, as they can keep animals and other pests away from your plants. There are a wide range of styles available, so you can choose the one that best fits your home and aesthetic preferences.

You can find wooden fencing in a variety of materials, but cedar is often considered the top choice because it’s naturally resistant to rot and weathering. It’s also more affordable than some other types of wood, but it may need to be treated more frequently. You can find other options, including pressure-treated pine and redwood, for a more budget-friendly but equally durable choice.

Another benefit of wooden fences is that they’re easy to customize with various paint and stain options. You can also choose to add a lattice topper for added privacy and a more decorative look. Lattices are usually made of diagonal slats that create diamond-shaped holes, and they’re available in a wide variety of heights.

Wooden fences are easy to build and can be a great DIY project for homeowners who have the time, tools, and skillset to do it. However, they’re not a good idea for beginners who lack the proper power tools and knowledge of safety techniques. Hiring a professional contractor is an excellent way to ensure that your fence is built correctly and stays safe throughout its lifetime.

A wood fence can be a beautiful addition to your yard, and it’s also an attractive selling point for potential buyers when you decide to sell your property. A well-maintained fence can significantly increase your property’s value and can also make it safer for children, pets, and other residents.

Security.

Wood fences are a great way to keep unwanted intruders off your property. They can also provide a safe environment for children and pets to play or use the bathroom. Choosing the right type of wood for your fence is essential to ensuring it will be long-lasting and secure. Some of the most popular types of wood for fencing include cedar, cypress, and redwood. These types of wood are rot-resistant and contain natural insect-repelling oils that help protect against pests.

To make sure your wood fence is sturdy enough to deter trespassers, it’s important to choose the right kind of wood and installation method. Some types of wood are more prone to rotting and other forms of damage than others, so it’s important to find the right fit for your climate. For example, if you live in an area with high humidity, you’ll want to choose wood that can resist decay.

Another factor that will affect the security of your wooden fence is its height. A taller fence will be more difficult to climb, which can deter intruders. You can also increase the security of your fence by adding a layer of concrete around its base.

Another way to boost your fence’s security is to install anti-climbing spikes. These spikes are designed to discourage trespassers by making it impossible for them to climb the fence without hurting themselves. However, it’s important to note that these spikes can be dangerous even for homeowners if they aren’t properly installed. It’s also a good idea to plant thorny plants near your fence to further deter burglars. This will not only deter them, but it will also add to the aesthetic of your home.

Roofing
Roofing

Benefits of Hiring Roofing Contractors

Roofing Companies Colorado Springs can inspect and repair your roof after a storm. They can also help you choose the right materials for your project. In addition, they can make sure that your roofing installation meets local building codes and standards.Roofing

A roofing contractor is a person or company that performs various tasks related to the installation of roofs on residential and commercial buildings. They typically have extensive experience in the construction industry and are knowledgeable about the various types of roofing materials and techniques. They also work with clients to determine their needs and provide estimates on labor costs and materials. They may also assist with obtaining building permits and inspections.

Roofing contractors often have customer service responsibilities, so excellent communication and interpersonal skills are important. They also have a working knowledge of the many different roof materials, styles, and colors available to meet the specific requirements of each client. They are also familiar with the local weather patterns and other factors that can affect the durability of a roof.

In some states, roofing contractors must be licensed to operate a business. They must be able to demonstrate their knowledge of the industry and have at least two years of professional experience. In addition, they must pass a state exam and possess a clean record. Moreover, they must be bonded and have workers’ compensation and liability insurance.

Another important factor to consider when hiring a roofing contractor is their reputation in the community. A reputable roofing contractor will have many positive reviews and a solid track record. They will also be able to provide proof of their licenses and insurance. Ideally, you should choose a roofing contractor who is a member of a manufacturer’s credentialed network and has a strong local presence.

Many scammers target homeowners who are in the process of re-roofing their homes. They will contact them for an estimate and then send a middleman to their home to inspect the roof. The middleman will then try to convince the homeowner that they need to take over their insurance claim and perform the roofing repairs for them. Often, these scammers will not be bonded or insured, so if they do not finish the job, they can file a mechanic’s lien on the homeowner’s property.

A reputable roofing contractor will have extensive experience in the field and will be able to perform multiple types of home improvement projects, including windows and siding. They will have the skill and expertise to handle these projects, as well as the proper tools and equipment to ensure that they are done correctly.

Licensing

A roofing contractor should be licensed in the state where he or she is performing the work. He should also have a business license, liability insurance, and workers’ compensation insurance. He should also have a roofing contract that spells out the scope of the work, including materials and labor. The contract should also contain any warranties, permits, cleanup, and disposal services that are required.

The states vary in their licensing requirements, but most require the roofing contractor to pass a trade exam and provide proof of insurance. Some states may also require a bond. Additionally, local municipalities often have licensing requirements that must be met before a roofer can start working on a project.

Some states, such as New York, have additional requirements for contractors who perform roofing or siding work. The new rules are in place to protect homeowners by ensuring that contractors are properly trained and have the necessary insurance coverage.

Other states, such as Louisiana, require a state license for all building construction and home improvement projects worth more than $75,000, which is issued by the Louisiana State Licensing Board for Contractors. Those who work with asbestos are also required to be licensed in the state where they are operating, as this product poses a health risk for the public.

Some states, such as Idaho, do not require a roofing contractor to be licensed. However, the state does require that roofing contractors register with the Idaho Contractors Board. Those who register must provide their name, address, contact information, and the type of business they operate. In addition, the contractor must pass a trade exam and provide proof of workers’ compensation and general liability insurance. A bond is not required in Idaho, but a certificate of insurance showing the proper limits must be provided to the board.

Insurance

Roofing is an extremely dangerous job, and even with all of the safety precautions that are taken, injuries still happen. Roofing contractors need to carry workers’ compensation insurance so that injured employees can be covered. If a roofer doesn’t have this coverage and an employee is injured on the job, the business could be held responsible for all medical bills and costs associated with the injury. A good contractor will be able to provide proof of insurance to you before starting work on any projects.

Having general liability insurance is also essential for roofing contractors. This type of insurance will pay for legal costs and awards awarded against the company in cases where third parties are injured on the job site. Roofing worksites often get messy, and with ladders, stacks of shingles, pallets of replacement materials, tools, and more scattered around the site, there is a high risk that someone will trip over something and be hurt. General liability for roofing contractors will pay for any medical expenses, legal fees, or damages awarded against the company as a result of such an incident.

Professional liability insurance is another important component of roofing contractor insurance. If you consult with clients about their roofing needs and give them advice that results in financial loss, then you may need this coverage. This type of policy covers legal claims for libel, copyright infringement, or other issues that could arise from giving this advice.

Inland marine insurance is also a popular option for roofing contractors to consider. This type of insurance will cover any damage that occurs to a company’s equipment while it is in transit. Roofing companies that need to ship their specialized tools and equipment in and out of work sites on a regular basis might find this coverage invaluable.

If you are interested in purchasing a roofing contractor’s insurance policy, it is best to talk with an independent agent who can make sure that you are getting the right coverage for your specific needs. An experienced agent can help you understand the different types of insurance available for roofing contractors, and they can also recommend any additional policies that may be necessary to protect your company from common risks.

Bonding

The term “bonded roofing contractor” refers to a professional who is required by state or local law to hold a bond in order to perform work on a commercial or residential roofing project. This type of bond is typically a form of surety that protects the customer against any monetary loss due to the roofing contractor’s failure to complete the job or if they commit fraud while performing the contract. It is important to check with your local licensing and insurance agency to see what requirements are in place for your area.

While this additional layer of protection does have some drawbacks, it can be worth the extra cost to ensure that your project is completed properly by a trustworthy and qualified professional. The most obvious downside is that bonded contractors must pay a premium to become bonded, and this must be passed on to the client in the form of higher project fees. Additionally, a bonded roofing contractor will often have to submit detailed business plans, financial statements, and proof of a solid reputation to the bonding company in order to be approved for the bond.

In addition to holding a license, most roofing contractors will also need to have workers’ compensation and general liability coverage in order to be eligible for a job. Liability insurance will cover damage to the property that is caused by the roofing contractor, while workers’ compensation will provide for lost wages and medical services in the event of a workplace injury or death. Having this additional insurance will help to ensure that any unforeseen issues that may arise are handled professionally and quickly.

Many states will require that any roofing contractor hold a roofer license bond before they can begin working on any projects. The bond ensures that the roofing contractor will comply with all local laws and regulations, including the payment of taxes and the submission of proper permits for any construction activities. The bond amount will vary depending on the state or county, but any reputable roofing contractor should be able to obtain a bond for a reasonable price.