Stamped Concrete
Concrete Contractors

Stamped Concrete Adds Visual Appeal to Your Outdoor Spaces

Stamped Concrete Charles Town WV is durable and visually appealing, making it ideal for patios and outdoor kitchens. It also reduces fire hazards by providing a heat-resistant surface for combustible cooking appliances.Stamped Concrete

This unique process uses rubber stamps or texturizing mats to imprint a pattern into wet concrete. The color and texture choices can mimic brick, cobblestone, slate, wood, or other natural materials.

Concrete stamping is a way to add visual appeal to your home’s outdoor surfaces that mimics the look of more expensive materials such as stone, tile or wood planks. The result is an eye-catching surface that’s both durable and affordable.

When selecting a decorative concrete pattern, consider your home’s architectural style and the surrounding landscape. For example, if your home has a classic brick exterior, consider matching the pattern on the patio with the color of the bricks. A stamped overlay of concrete can also be used for an outdoor kitchen and barbecue area to reduce fire hazards from combustible cooking equipment, while providing an attractive area for friends and family to relax while waiting for food to cook.

There are several different types of stamped concrete patterns to choose from. Some of them are seamless, while others feature noticeable seams and joints like field or flagstone designs. Seamless concrete stamps usually have larger dimensions and are easier to work with than other types of stamped patterns.

If you’re working with a stamped concrete project that requires multiple people, it’s helpful to divide the work into different sections and assign specific tasks to each member of your crew. For example, one person can start the process by placing and standing on the starter tools to begin advancing the concrete, while another can do the tamping.

After the concrete is poured and stamped, it should be allowed to cure for several weeks before applying a sealer. When sealing stamped concrete, it’s recommended to use a roller to spread the sealer evenly across the surface. A light touch is generally more effective than a heavy application, which could trap moisture in the slab and cause it to crack over time.

Base Color

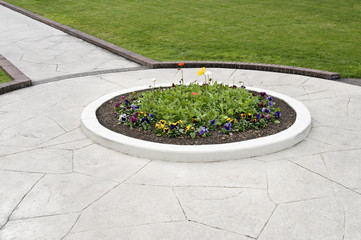
Using stamped concrete as an alternative to traditional materials, such as flagstone, brick or natural stone, allows homeowners to customize the look of their outdoor spaces. It can be made to mimic a variety of other building products, like granite or slate, and comes in a wide range of colors. It can also be molded into geometric shapes, like hexagons or circles. The color of the concrete can either match that of the home or accent the surrounding landscape and foliage.

The base color of the concrete is determined at the time of pouring. Two different coloring options are available to the homeowner: integral color and surface-applied color hardener. Integral color is mixed directly into the concrete at the ready-mix plant or on site by our professional installation crews. This option is preferred by many of our clients because it creates a more consistent color throughout the entire surface.

However, the advantage of having integral color does come with a disadvantage; because the color is mixed into the concrete, it is vulnerable to chipping and cracking which can reveal the original concrete aggregate underneath. To prevent this, a coating is applied over the concrete to protect it from damage. This is called a sealer and it can be purchased from most home improvement centers, such as Clear Guard(r) Cure & Seal.

For the most popular color options for stamped concrete, gray is an excellent choice because it works well with most homes. However, if you are trying to replicate a particular style, like limestone or marble, dark shades, like charcoal and black work well too. Adding streaks of color with a release is another way to add natural-looking color variation to the concrete.

Accent Color

Concrete is a durable, versatile material that can be used in a variety of ways to produce unique outdoor surfaces. Whether it’s a new patio, pool deck, driveway or sidewalk, stamped concrete provides a creative alternative to other costly building materials such as stone, slate or brick.

A popular option is to use textured rubber stamps or “skin” mats to imprint patterns into wet concrete, giving it the look and feel of stone, cobblestone, wood planks, brick or other rough textured materials. This process can also be used on existing concrete to add color and texture or even make a basement floor more appealing.

To help the stamped concrete mimic the appearance of these other natural materials, it is often tinted or stained with a secondary accent color. These color tones can be added using a powdered release agent or a liquid acrylic stain like Butterfield’s TruTique Antique Wash. Often contractors will combine these coloring products to achieve subtle tonal variations or “antiquing” effects in their colored stamped concrete projects.

These color tones will be left in the low points and depressions of the textured stamp impression, providing definition, character and a realistic finish to your decorative texture. These colors are referred to as your “Secondary Color” or “Release” color.

To produce a multi-colored, variegated or “antiqued” effect on a concrete surface, contractors typically start with a primary integral color, then apply a darker secondary accent color (powder release or a liquid acrylic stain) over the top of the wet concrete. The result is a rich, natural looking, durable colored concrete surface. This technique is also ideal for restoring dull, worn, faded or weathered stamped concrete or textured overlays.

Release Agent

When used correctly, a concrete release agent helps keep the stamps or texturing skins from sticking to the fresh overlay or concrete surface. This enables the contractor to get clean, precise imprints. Concrete releasing agents are available in powder or liquid form. They are typically sprayed onto the concrete just before stamping.

Many contractors use a different color of release agent to create accent colors on stamped concrete surfaces. This technique works especially well on light concrete base colors, such as integrally colored or color hardened concrete. The darker release agent is washed away during the stamping process, but a portion of it remains embedded in the textured concrete surface, providing a subtle color accent once the concrete has been washed and sealed.

The concrete is typically sprayed with a liquid release agent using a pump-type sprayer or sprayed directly onto the texture mat before stamping. Contractors can also tint the liquid release agent for a more uniform, even color distribution. If tinting the release agent, it is advisable to add the tint a day or two before beginning to stamp so that the pigment particles have time to fully dissolve.

A tampico brush about 8 inches wide is typically used to apply the release agent. It’s important to apply a thin, uniform layer of the product to prevent it from interfering with the stamp or texture imprint. Then, contractors begin the stamping process by firmly pressing the stamp or textured skin into the fresh concrete surface. The resulting textured or stamped concrete is then washed and sealed for long-lasting protection. Over time, the concrete will be subjected to weathering and abrasion from automobile traffic, de-icing salts and chemical exposure. Periodic washings with a mild detergent help to maintain surface luster and protect the concrete from staining and damage.

Stamping

The stamping process involves using rubber stamps or texturizing mats to imprint a pattern into wet concrete. This can be done on new or existing concrete, and it can make the surface resemble a variety of different materials, such as stone, wood, brick or cobblestone. This technique can be used to make patios, driveways, pool decks and more. It’s often more affordable than paving materials, and it can be very durable if properly maintained.

To get the best results from your stamped concrete, it’s important to use high-quality stamps and a good quality concrete mix. It’s also a good idea to use a color hardener that will last a long time, and to add a release agent to the concrete before you stamp it. Adding the release agent helps prevent the concrete from sticking to the stamp and making it difficult to remove.

When you’re ready to begin stamping, it’s important to work quickly and efficiently. Most concrete sets up quickly, so you need to begin stamping it before it dries too much. If you wait too long, the stamps will have a hard time getting into the concrete and will leave little to no texture behind them.

It’s also a good idea to pre-texture the slab perimeter about 1 to 2 feet with a flex mat or texturizing skin before you begin. This will help you get a more uniform texture across the entire slab. You should also start in the middle of the slab and work outward, instead of starting at one end. This will eliminate the common problem of having great texture where the stamping began, but almost none at the far edges of the slab.

flooring
Flooring

How Hardwood Floor Refinishing Can Make Your Home More Attractive

flooringHardwood Floor Refinishing Bergen County NJ can make your home more attractive to potential buyers, increasing the value of your property. It also eliminates safety hazards like splintering wood and dated finishes. It’s important to know that not all hardwood floors can be refinished, especially engineered wood. Solid hardwood floors can be refinished, but refinishing engineered wood requires extra care to avoid sanding through the veneer and exposing plywood underneath.

A thorough sanding is the first step in refinishing hardwood floors. It is also one of the most difficult parts of the process and requires special equipment. To do it properly, you’ll need a drum or orbital sander, an edger, a hand scraper and a vacuum cleaner. You should also have a variety of sandpaper grits, from coarse to fine. Before sanding, remove any furniture or wall hangings from the room and cover any fixed items with plastic sheeting to protect them from dust. You should also wear a dust mask, ear protection and eye protection during this phase of the project.

After sanding the floor, you should vacuum it thoroughly to remove any remaining dust. You can then use a buffer to smooth the surface and create an even texture. This is also the time to fill in nail holes, gouges and other minor imperfections. If you want the repair to match the color of your new finish, use wood putty mixed with sawdust and applied with a brush.

Cupping is another problem that can occur during a refinish. It happens when the tops of the planks bend down and leave gaps between them. It usually occurs in areas that get a lot of moisture, and it can be corrected by using a different sanding screen or by refinishing the entire floor.

Once the floor is smooth, you can reinstall base shoe molding — sometimes called quarter-round — around the perimeter of the room. This is easy to do with a brad nailer. Then reinstall the baseboards and caulk any cracks in the walls and joints between them.

If your hardwood floors have deep scratches, dents and other damage, a professional may be the best choice for refinishing them. A qualified hardwood flooring refinisher can make sure that any repairs blend seamlessly into the rest of the floor and that the finished product is flawless. They can also advise you on whether your floors need a complete refinish or whether a recoat is sufficient. A recoat is much simpler, and it’s cheaper than a refinish.

Staining

Staining hardwood floors the right way can help ensure they’re both beautiful and durable. Whether you’re refinishing, resealing, or simply staining wood floors that have never been stained before, it’s important to follow instructions carefully so that the result is exactly as you want it. Staining is a messy job, so be sure to wear gloves, take precautions against dust and dirt, and cover furniture. You’ll also need to thoroughly clean the surface of your floor before staining, vacuuming and wiping it down with a microfiber cloth or tack towel. Even a tiny speck of dust or dirt left on the floor can mar the finished stain.

Before you start staining, it’s a good idea to test the color of your new stain in an inconspicuous area. Choosing the wrong color is one of the most common mistakes made by DIYers. If you’re unsure what to choose, ask your flooring professional for samples of different colors and see how they look on the actual floor.

When the staining is complete, you may need to water pop your floor before sealing. This process opens the pores of the wood, making the appearance of the stain less blotchy and uneven. This step is especially important when working with darker stains or if you’re going for a richer color.

Once the stain is dry, it’s time to seal your floors. There are several options for this, including polyurethane and hardwax oil. Whichever option you choose, be sure to apply two coats and let them fully dry between each application. If you have any questions about how to apply the sealer or finish, ask your flooring professional for help.

Depending on your choice of stain and the color you’ve chosen, it can take several hours for your floor to completely dry. Once it has, you’re ready to enjoy your refinished floors! Whether you’re looking for an earthy brown or a neutral gray, staining your hardwood floors is an easy and affordable way to enhance your home. With the right preparation, a little bit of patience, and the help of a flooring professional, your hardwood floors will look beautiful for years to come.

Sealing

When refinishing hardwood floors, it’s important to protect them with at least two coats of protective finish. The finish helps keep water and chemicals off the wood, preventing damage to the floor and prolonging its life.

The first step is to thoroughly clean the surface of the floor, removing all dirt and debris. Once the floor is clean, you can apply the sealant.

A polyurethane sealant is the most common choice for hardwood flooring. It is available in different finishes, from matte to gloss, and comes in both water-based and oil-based versions. Water-based polyurethanes are typically quicker to dry than oil-based ones. They also tend to have less of an odor and are generally more environmentally friendly.

Before applying any kind of finish to your hardwood floors, it is important to read the instructions carefully. It is also important to test the finish in an inconspicuous area of the room to see how it looks and how it reacts with your particular flooring.

Choosing the right stain is another important part of this process. Your floor specialist should have samples of stains that you can look at to get an idea of how the stain will look on your floors. It’s also a good idea to do some research on your own to find stains that you like the look of.

Once you’ve decided on the type of stain, your floor professional can help you with the rest of the refinishing process. They will use a high-density foam roller to apply the stain, and may need to use a brush in some areas. After the stain is applied, it will need to dry completely before you can apply a second coat.

Penetrating oil finishes are a popular option because they give the wood a rich, warm amber color and offer a high level of protection. However, these finishes can’t hold up to heavy foot traffic and must be re-oiled every three to five years. Oil finishes can also be very difficult to touch up, as they are easily damaged by water and chemical spills.

Installation

Hardwood floors are beautiful, durable and add a sense of sophistication to any room. However, they can become scratched or scuffed over time, and they do require some maintenance to keep them looking their best. Fortunately, hardwoods can be refinished to remove scratches and dents and restore their original beauty. This process will also protect the floor from future damage, making it look new again. Unlike other types of flooring, sanding hardwood floors is not difficult, and it can be done by homeowners with minimal experience.

Before sanding, it’s important to clean the floor thoroughly to ensure there is no dust or dirt that could affect the final finish. This can be done by vacuuming and wiping down the surface with a microfiber cloth or tack cloth. The tack cloth should be dampened with mineral spirits to get the most out of the cleaning.

Sanding can take two to four days, depending on the condition of the wood and how much work is needed. Once the sanding is complete, it’s time to stain the floor. Using the same color stain as the existing floor is usually recommended, as this will give a consistent appearance. Staining can take up to two days as well.

Once the stains have dried, the floor can be reinstalled. Be sure to countersink all face-nails and fill any nail holes with wood putty that matches the floor color. Replace baseboards, shoe molding and trim as necessary. Often, the floor meets an obstruction like a fireplace or wall, and if this is the case, it is often recommended to miter boards around these obstacles to create a frame that mates with the rest of the floorboards.

Some people prefer to install prefinished hardwood flooring, which saves a lot of installation time. However, this option is not ideal for those with busy lifestyles, as the floors must be sanded and stained on-site before they can be installed. Engineered hardwood is another alternative, but it’s important to understand that this type of wood is not as solid as solid hardwood. It consists of a thin layer of real wood, known as a veneer, which is bonded to a cheaper material, such as plywood. You can refinish engineered wood floors, but the veneer needs to be thick enough to avoid accidentally sanding through it and exposing plywood.

Fence Repair
Fence

Fence Repair Tips to Keep Your Fence in Good Shape

Even the most durable fences can suffer damage from storms, animals, or simple aging. A damaged fence can leave your yard vulnerable to intruders and detract from the overall appearance of your home.Fence Repair

Before repairing any fence problem, it’s important to diagnose the cause. Whether it’s something as simple as a rotted post or something more complex like a bent metal post, the first step is to dig around the base.

Whether they’re wooden or metal, fences are prone to damage from the elements. Wooden fences, in particular, are prone to warping, rot, and insect infestation. However, regular maintenance and preventive repairs can keep your fence in good shape. If you notice any issues with your fence, you should address them right away before the problem escalates.

If your fence has a sagging rail, it’s important to identify the cause of the problem. It may be a sign of a faulty foundation or a loose post. If the foundation is weakened, it’s important to shore it up with concrete. It’s also a good idea to install additional posts in the area to provide support.

Sagging rails can be repaired by using chain-link fence ties to connect the top of the fence to the bottom. Depending on the size of your fence, you might need to use several wires to make this connection. You can buy these ties at most hardware stores. If you’re planning to do the repair yourself, you should first locate the damaged section and the undamaged portion of the fabric. Then, use lineman’s pliers to untwist the wire ties and free the fabric from the fence.

Then, use the same pliers to straighten out the bent portion of the wire. If the wire is rusty or severely damaged, you should replace it with new wire.

Fence gate repairs can be tricky, and they’re often the result of misjudged materials or poor workmanship from the original builder. However, you can fix a sagging gate by adding tension to one side of the gate with a turnbuckle and cable kit. You can purchase these kits online or at most hardware stores. The kits include two to four corner braces, a turnbuckle, cable, and fittings. You can also add a diagonal brace to the gate frame to increase its stability. This will relieve pressure on the sagging side of the gate and prevent it from sagging in the future.

Broken posts

Many fence repair projects involve fixing broken posts. However, it is important to assess the severity of the damage before deciding how to approach the task at hand. For instance, if a post has simply shifted out of alignment and is not rotting or otherwise damaged, you may only need to reset it. On the other hand, if a post has broken off completely or is severely weakened by wood rot, you will likely need to replace it.

Before beginning any work, it’s a good idea to make sure that you have the proper tools and supplies to complete the job. Having these items nearby will make the job much easier and less stressful. Some tools to have include hammers, wrenches, a drill, a shovel, and safety equipment such as goggles and gloves.

Once you have all the necessary tools, start by excavating around the post foundation to expose the concrete base and determine its condition. If the concrete is in poor shape, it is a good idea to use a grinder with a masonry blade attachment to break it up and remove it. This method is especially useful for older concrete posts, which are typically made from a weaker and drier mix of cement. You should aim to retain the first few inches of soil in order to dress the top of the hole once the repair is complete.

If the post has already broken off at ground level, it’s important to shore up the area to prevent a domino effect whereby the loose post causes further damage to other posts and panels in the vicinity. This can be done using a variety of methods, but one popular option is to use wood putty. This product is available in various forms, but it should be clear that this is not a permanent solution and will likely require further attention from a professional.

Similarly, if the post is rotted but not yet broken off at ground level, you can try to use the Wood Post Puller method to remove the existing concrete footing and wood post stump so that a replacement can be set in place. Once the new post is in place, it should be treated against rot and water damage to avoid a repeat of the problem.

Damaged panels

Even the best-built fences can experience environmental damage over time. Weather impacts like high winds and humidity can weaken the materials used to build a fence and cause structural problems. These problems can include a leaning gate or loose panels. While these issues usually indicate the need for a repair or replacement, they don’t necessarily require replacing the entire fence.

Before beginning a DIY fence repair, it’s important to assess the damage and determine whether it’s worth repairing or not. It’s essential to decide if the damage is acute, like a rust spot that can be repaired with paint, or chronic, such as wood rot. It’s also important to consider the size of the damage and how long it will take to repair it.

Typically, repairing cracks and holes is a simple process for most types of fencing materials. If you have a vinyl fence, start by using an alcohol-soaked cloth to wipe away any excess debris. Then, apply a layer of auto body filler to the hole and allow it to dry. Once the filler dries, you can use a knife to smooth it and make sure that the repair blends in with the rest of the fence.

If you have a damaged panel that can’t be repaired, it may be necessary to replace it entirely. It’s important to choose a material that is suited to your climate and can withstand the elements. If you have a steel or iron fence in an area that experiences a lot of humidity, it’s a good idea to choose a coating that is moisture-resistant.

It’s a good idea to have a friend assist you in installing a new panel if you can’t handle the weight by yourself. Ensure that the panel is level before screwing it into place. If the panel has a metal base, you should attach a pair of metal clips to the post to hold it in place.

Replacing a board or slat is a simple and inexpensive process for most types of fences. The price of a new panel will depend on the material type, the extent of damage, and the height of the fence.

Bent rails

Chain link fences get a bad rap compared to charming white pickets and gothic wrought iron, but they are practical and incredibly durable. They also tend to be less expensive than many other fencing options, making them a popular choice for homeowners and businesses. Like anything, however, they can break down and need repair, especially when a storm or critters get to them.

Bent rails can be a serious problem that jeopardizes the structural integrity of the whole fence and leads to costly replacement. Fixing a single bend is relatively easy, but multiple ones may require the replacement of the entire fence or sections. In such cases, you will likely want to use wire ties to connect the new sections of fence to the existing fabric using linesman’s pliers.

To begin, locate the area of bent rail and straighten it out as much as possible by finding the hooked end of the wire and untwisting it with lineman’s pliers. Then, find two points of fabric on either side of the damage and use a similar technique to remove the wires holding them in place. Then, find a replacement piece of pipe and cut it to length with your reciprocating saw. Make sure the new section is a slightly different length than the old one to prevent it from twisting under its own weight when it’s installed.

After cutting the new rail, loosen a rail end (the cup-like fitting that holds the rail to the post) with an adjustable wrench and lower it until there is enough space to align the larger end of the replacement rail with the sleeve on the existing one. Then, slide the replacement rail’s tapered end into the existing one. Finally, slide the rail coupling over the other end of the replacement rail to attach the two and tighten.

If your gate is broken, you can easily replace it at a fraction of the cost of replacing your fence. To start, disconnect the hinge strap from the gate by sliding a bolt through the hole and tightening it with a socket wrench. Slide the gate hinge away from the fence and set it aside. Locate the latch plate and the hinge pin inside the gate frame, and then use a screwdriver to remove the nut from the gate post and set it aside as well.

Siding Contractor

How to Choose the Right Siding for Your Home

While the exterior of your home protects your family, you also want it to look attractive no matter what kind of weather you’re facing. However, you may need to know which type of siding to use on your home. Here are some helpful tips to make the best decision. Read on to learn more about siding options for your home. You’ll be glad you did! Also, consider the different types and costs of siding materials. This will make the decision much easier.

Siding Contractor
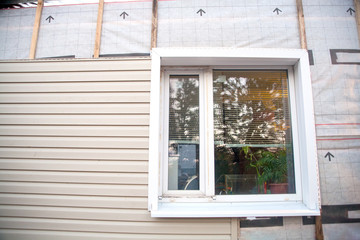
While there are many types of siding, vinyl siding is the most popular choice. It’s low maintenance and inexpensive and comes in hundreds of colors. There are several different profiles, including shakes, shingles, fish scales, and lap. It doesn’t need much maintenance, but you might need to scrub it occasionally to keep it looking good. You can hire a professional contractor at https://sidingrepaircharleston.com/ to complete the installation.

Wood siding requires regular maintenance and repair. Generally, wood siding lasts up to 40 years, but if you notice a few dents or dings, it’s best to replace them before they cause extensive damage or spread rot. It would be best if you also painted or applied fungicide every three to four years, particularly in warm climates. For best results, go with expensive wood siding. These materials are usually more durable and decay-resistant than cheaper wood siding.

The siding on your home is vital in protecting your home from harsh weather. It acts as a shield, keeping moisture and dirt out. If it is damaged, water or snow may enter the house and cause damage to the interior. In addition to protecting your home’s interior, siding protects the structure of your house, preserving the infrastructure. You can save money on repair bills by installing siding promptly. But, if you need more time for a new job, you should opt for an affordable siding replacement.

Stone veneer can add an elegant look to your home. It can be a great upgrade if your home’s foundation walls are concrete. It’s also a great option for fireplace surrounds and lower main-level walls. Stone veneer is relatively lightweight, so it’s more affordable than real stone, but it may only last for a while. It’s also fire and insect-resistant so it won’t warp or crack. It is one of the most durable materials for exterior walls.

Wood siding has many benefits, including durability. It can be custom-made or manufactured. The siding is durable but needs to be smaller than the wall it covers. It also needs to be flexible enough to accommodate changes in temperature and moisture. There are several different styles of siding, including board and batten, which covers the butt joints between panels with a thin strip. Lap siding is a good choice because it overlaps boards horizontally to prevent water from entering the wall.

Fiber cement siding is another popular option, but it is very expensive on average and requires periodic painting. This type of siding can also come with moisture-related problems. If your house was built before the 1980s, you may have fiber cement siding containing asbestos. If you’re thinking of installing fiber cement siding on your home, research your options carefully before making a final decision. They’re both good option for your home’s exterior.

Aside from the many advantages of metal siding, it’s also one of the most expensive. The only downside is that it can rust easily. You should also ensure sealing and finishing properly if you want to avoid rusting. Another disadvantage of metal siding is its heaviness. While this type of siding may have a negative connotation, metal is increasingly becoming popular. If you’re not afraid of the price, you can choose siding made of aluminum or steel.

Siding is an important part of your home’s exterior and plays a vital role in keeping it safe from the elements. It helps keep the warmth in during cold weather and gives it a beautiful appearance. Aside from keeping your home safe from the elements, siding also makes it easier to sell. You can choose various colors and styles for your home to create curb appeal. Once you’ve decided on a style, siding can make the difference between selling your home quickly and losing value.