
 Hardwood Floor Refinishing Bergen County NJ can make your home more attractive to potential buyers, increasing the value of your property. It also eliminates safety hazards like splintering wood and dated finishes. It’s important to know that not all hardwood floors can be refinished, especially engineered wood. Solid hardwood floors can be refinished, but refinishing engineered wood requires extra care to avoid sanding through the veneer and exposing plywood underneath.
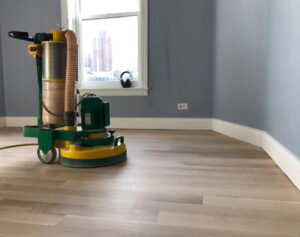
A thorough sanding is the first step in refinishing hardwood floors. It is also one of the most difficult parts of the process and requires special equipment. To do it properly, you’ll need a drum or orbital sander, an edger, a hand scraper and a vacuum cleaner. You should also have a variety of sandpaper grits, from coarse to fine. Before sanding, remove any furniture or wall hangings from the room and cover any fixed items with plastic sheeting to protect them from dust. You should also wear a dust mask, ear protection and eye protection during this phase of the project.
After sanding the floor, you should vacuum it thoroughly to remove any remaining dust. You can then use a buffer to smooth the surface and create an even texture. This is also the time to fill in nail holes, gouges and other minor imperfections. If you want the repair to match the color of your new finish, use wood putty mixed with sawdust and applied with a brush.
Cupping is another problem that can occur during a refinish. It happens when the tops of the planks bend down and leave gaps between them. It usually occurs in areas that get a lot of moisture, and it can be corrected by using a different sanding screen or by refinishing the entire floor.
Once the floor is smooth, you can reinstall base shoe molding — sometimes called quarter-round — around the perimeter of the room. This is easy to do with a brad nailer. Then reinstall the baseboards and caulk any cracks in the walls and joints between them.
If your hardwood floors have deep scratches, dents and other damage, a professional may be the best choice for refinishing them. A qualified hardwood flooring refinisher can make sure that any repairs blend seamlessly into the rest of the floor and that the finished product is flawless. They can also advise you on whether your floors need a complete refinish or whether a recoat is sufficient. A recoat is much simpler, and it’s cheaper than a refinish.
Staining
Staining hardwood floors the right way can help ensure they’re both beautiful and durable. Whether you’re refinishing, resealing, or simply staining wood floors that have never been stained before, it’s important to follow instructions carefully so that the result is exactly as you want it. Staining is a messy job, so be sure to wear gloves, take precautions against dust and dirt, and cover furniture. You’ll also need to thoroughly clean the surface of your floor before staining, vacuuming and wiping it down with a microfiber cloth or tack towel. Even a tiny speck of dust or dirt left on the floor can mar the finished stain.
Before you start staining, it’s a good idea to test the color of your new stain in an inconspicuous area. Choosing the wrong color is one of the most common mistakes made by DIYers. If you’re unsure what to choose, ask your flooring professional for samples of different colors and see how they look on the actual floor.
When the staining is complete, you may need to water pop your floor before sealing. This process opens the pores of the wood, making the appearance of the stain less blotchy and uneven. This step is especially important when working with darker stains or if you’re going for a richer color.
Once the stain is dry, it’s time to seal your floors. There are several options for this, including polyurethane and hardwax oil. Whichever option you choose, be sure to apply two coats and let them fully dry between each application. If you have any questions about how to apply the sealer or finish, ask your flooring professional for help.
Depending on your choice of stain and the color you’ve chosen, it can take several hours for your floor to completely dry. Once it has, you’re ready to enjoy your refinished floors! Whether you’re looking for an earthy brown or a neutral gray, staining your hardwood floors is an easy and affordable way to enhance your home. With the right preparation, a little bit of patience, and the help of a flooring professional, your hardwood floors will look beautiful for years to come.
Sealing
When refinishing hardwood floors, it’s important to protect them with at least two coats of protective finish. The finish helps keep water and chemicals off the wood, preventing damage to the floor and prolonging its life.
The first step is to thoroughly clean the surface of the floor, removing all dirt and debris. Once the floor is clean, you can apply the sealant.
A polyurethane sealant is the most common choice for hardwood flooring. It is available in different finishes, from matte to gloss, and comes in both water-based and oil-based versions. Water-based polyurethanes are typically quicker to dry than oil-based ones. They also tend to have less of an odor and are generally more environmentally friendly.
Before applying any kind of finish to your hardwood floors, it is important to read the instructions carefully. It is also important to test the finish in an inconspicuous area of the room to see how it looks and how it reacts with your particular flooring.
Choosing the right stain is another important part of this process. Your floor specialist should have samples of stains that you can look at to get an idea of how the stain will look on your floors. It’s also a good idea to do some research on your own to find stains that you like the look of.
Once you’ve decided on the type of stain, your floor professional can help you with the rest of the refinishing process. They will use a high-density foam roller to apply the stain, and may need to use a brush in some areas. After the stain is applied, it will need to dry completely before you can apply a second coat.
Penetrating oil finishes are a popular option because they give the wood a rich, warm amber color and offer a high level of protection. However, these finishes can’t hold up to heavy foot traffic and must be re-oiled every three to five years. Oil finishes can also be very difficult to touch up, as they are easily damaged by water and chemical spills.
Installation
Hardwood floors are beautiful, durable and add a sense of sophistication to any room. However, they can become scratched or scuffed over time, and they do require some maintenance to keep them looking their best. Fortunately, hardwoods can be refinished to remove scratches and dents and restore their original beauty. This process will also protect the floor from future damage, making it look new again. Unlike other types of flooring, sanding hardwood floors is not difficult, and it can be done by homeowners with minimal experience.
Before sanding, it’s important to clean the floor thoroughly to ensure there is no dust or dirt that could affect the final finish. This can be done by vacuuming and wiping down the surface with a microfiber cloth or tack cloth. The tack cloth should be dampened with mineral spirits to get the most out of the cleaning.
Sanding can take two to four days, depending on the condition of the wood and how much work is needed. Once the sanding is complete, it’s time to stain the floor. Using the same color stain as the existing floor is usually recommended, as this will give a consistent appearance. Staining can take up to two days as well.
Once the stains have dried, the floor can be reinstalled. Be sure to countersink all face-nails and fill any nail holes with wood putty that matches the floor color. Replace baseboards, shoe molding and trim as necessary. Often, the floor meets an obstruction like a fireplace or wall, and if this is the case, it is often recommended to miter boards around these obstacles to create a frame that mates with the rest of the floorboards.
Some people prefer to install prefinished hardwood flooring, which saves a lot of installation time. However, this option is not ideal for those with busy lifestyles, as the floors must be sanded and stained on-site before they can be installed. Engineered hardwood is another alternative, but it’s important to understand that this type of wood is not as solid as solid hardwood. It consists of a thin layer of real wood, known as a veneer, which is bonded to a cheaper material, such as plywood. You can refinish engineered wood floors, but the veneer needs to be thick enough to avoid accidentally sanding through it and exposing plywood.